Protecting your first server
This guide assumes that you have followed the previous walkthrough for installing and Configuring Backup Agent for Windows or Linux.In this tutorial, we assume that you would like to back up a Windows 2008 server twice a day, 12pm and 12am everyday.
Having installed the Backup Agent in your Windows server, you are ready to back up your server. There are three steps you need to perform.
1. Add a server to Backup manager
2. Add a disk safe(backup storage) for your server
3. Create a backup policy to schedule when to back up your business server
1. Add a server to Backup Manager
In a web browser, enter the url or ip address of Backup manager provided by In2net. We use r1cdp01.in2net.com as an example.
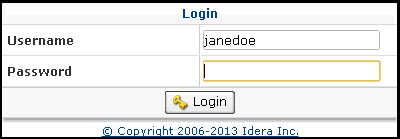
A login page will appear. Enter your username and password followed by clicking [LOGIN] button.
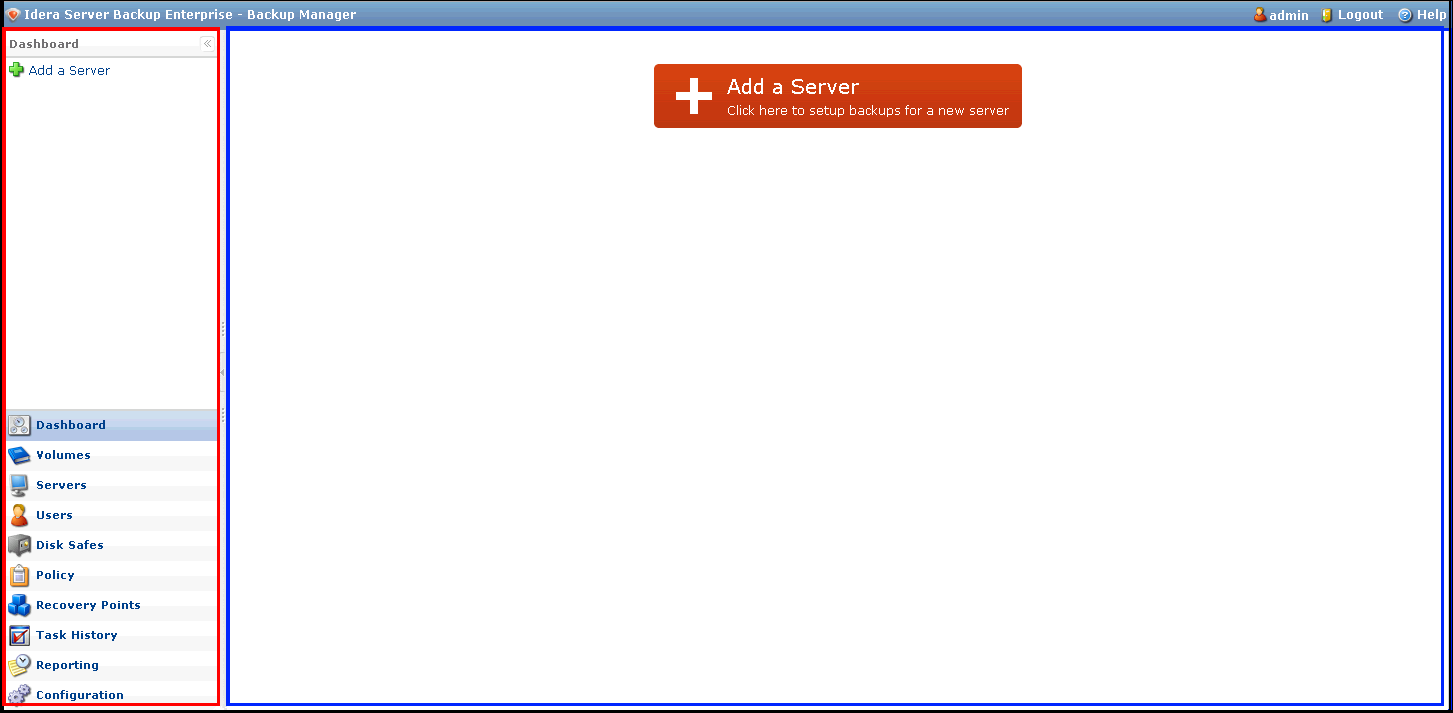
After you have successfully signed in, you will see Backup manager's web based console.
The Backup manager is divided into two panes. The left pane (circled by red color) is the navigation menu. The right pane (circled by blue color) is where most actions takes place.
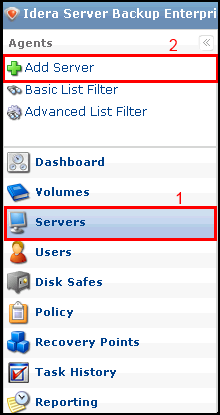
In the left pane, click on "Servers" in the lower menu(1), then select "Add Server" in the upper menu(2).
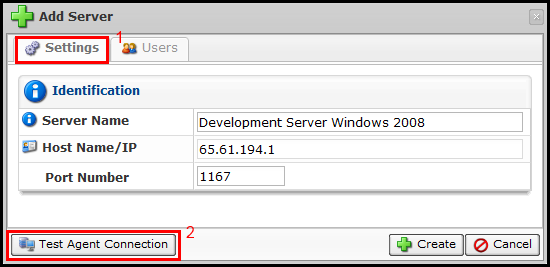
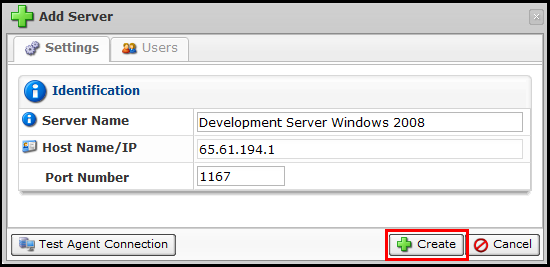
The following "Add Server" dialog box will appear.
In the "Settings" tab(1), you need to provide the following information.
- Server name: Give your server a name for identification. e.g. Development Server Windows 2008
- Host name/IP: Enter the ip address of your server which has Backup agent installed. e.g.: 65.61.194.1
- Port number: This is the tcp port which Backup manager uses to communicate with Backup agent on your server to be replicated.
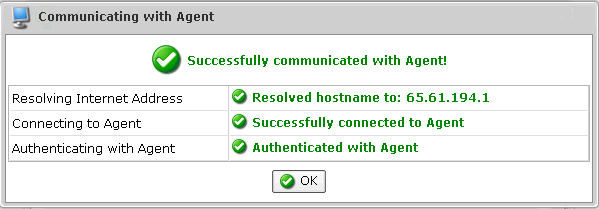
When you are done, click [TEST AGENT CONNECTION] button(2) (in the lower left corner) to ensure Backup manager can talk to Backup agent on your server.
The following message informs you that Backup manager and Backup agent on your server has communicated successfully.
- Check if you have entered a correct url or ip address of Backup manager in your web browser.
- Check if you have the tcp port opened correctly in your firewall(hardware/software).
Click [OK] to close the status message above, then click [CREATE] button (in the lower rigth corner) when you are returned to the following screen.
Your successful action will be confirmed by the following message.

2. Add a Disk Safe for your Server
Next you need to create a Disk Safe for your server's data that is to store all versionings and backup data from your server. .
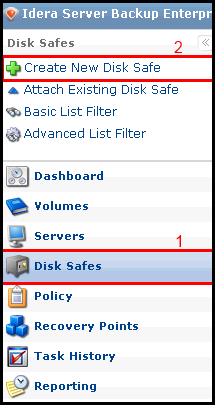
In the left pane, first click "Disk Safe" in the lower menu then click on "Create new Disk Safe" in the upper menu.
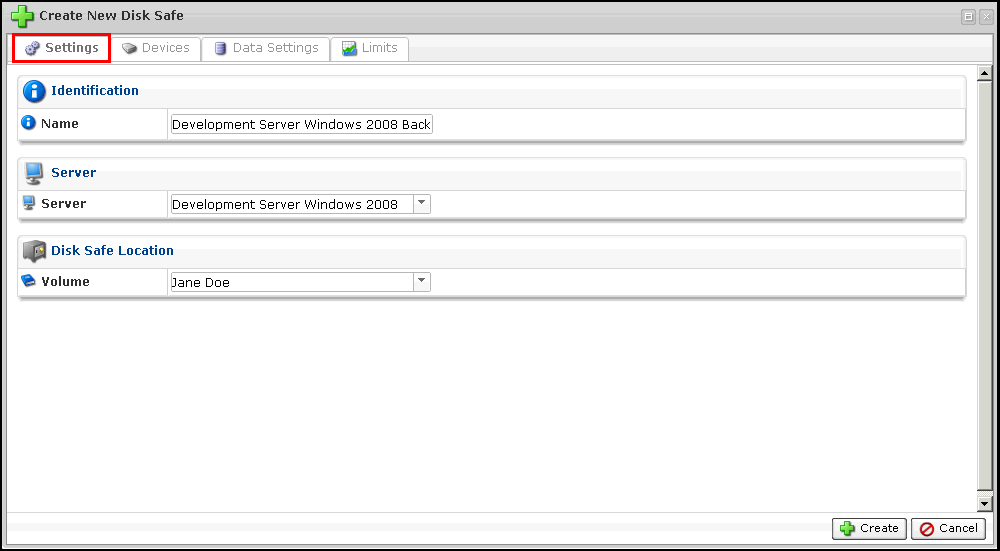
"Create New Disk Safe" dialog box will pop up. In "Settings" tab, you need to provide the following information.
- Identification: Give a name to identify this disk safe. e.g. We use Development Server Windows 2008 Backup
- Server: The server you want to back up into this disk safe
- Disk Safe Location: Volume is the home folder for keeping all your disk safes for your servers.
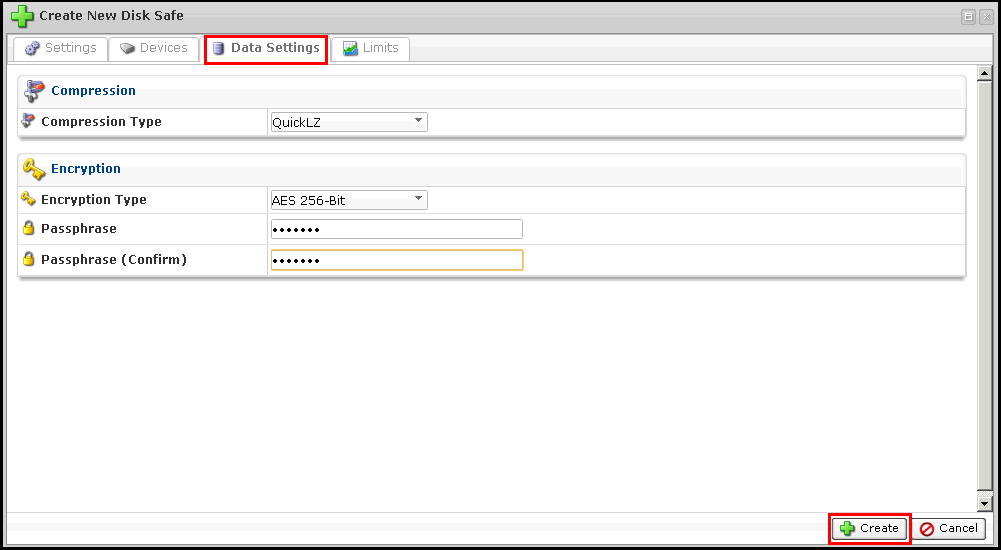
Next, click on "Data Settings" tab, and provide information about the following.
- Compression Type: Select "QuickLZ" for now
- Encryption Type: If you select None for no encryption, your backup will not be protected. To enable encryption, select "AES 256-Bit" for Encryption Type, then you will need to provide a passphrase for this type of encryption.
The following message will confirm that your new disk safe has been successfully created.

3. Create a Backup policy to schedule your Server Backup
Now, you have added your Windows server to Backup manager, and created a disk safe for backing up your server data. You would need to create a data retention policy to tell Backup manager when to replicate your server.
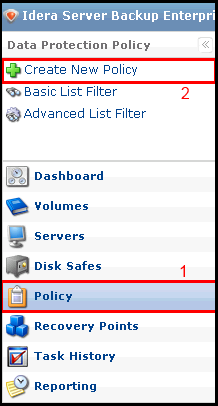
In the left pane, select "Policy" in the lower menu(1), then select "Create New Policy" in the top menu(2).
"Create New Policy" dialog box has eight tabs. "File Excludes" and "Advanced Excludes" tabs allow you to exclude certain folders and files. "SQL Server", "Exchange" and "MySQL" let you replicate a particular type of server applications like SQL Server, Microsoft Exchange Server and MySQL Server. Since our goal here is to back up our Windows server at a scheduled time, we will only set up the backup schedule.
In "Policy Settings" tab, there are 3 sections: Identification, Disk Safe, and Scheduling
- Identification: Create a name to identify this backup policy. You may also provide a short description about this policy in Description field.
- Disk Safe: Select a server and its disk safe that this policy is applied to.
- Scheduling: There are three types of schedules you can define:
- Replication schedule: time/date when you would like your server to be backed up. We will use this function to define our backup schedule.
- Merge Schedule: time/date when recovery points are merged
- Disk Safe Verification Schedule: time/date when the health of your disk safe is verified.
- Replication schedule: time/date when you would like your server to be backed up. We will use this function to define our backup schedule.
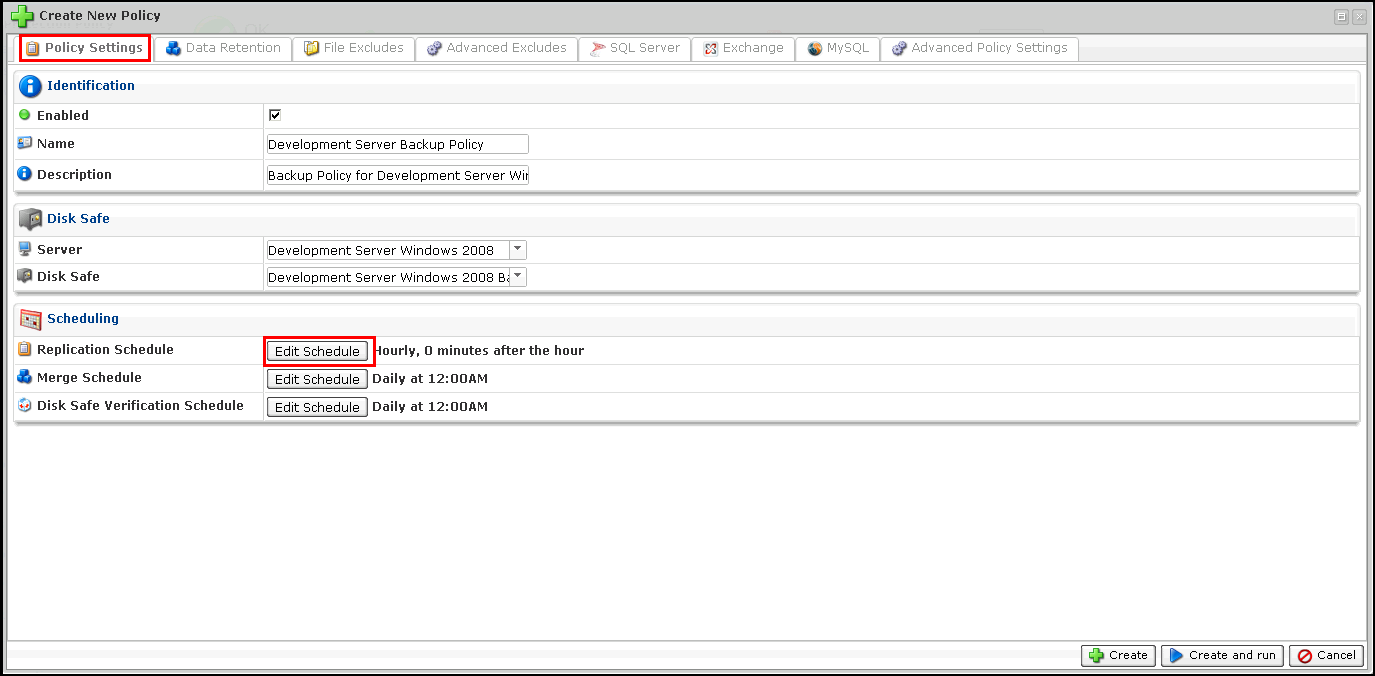
By default, backup will only be performed on demand. Say, we would like our server to be replicated at midnight and at noon everyday, we click on [EDIT SCHEDULE] button for Replication Schedule.
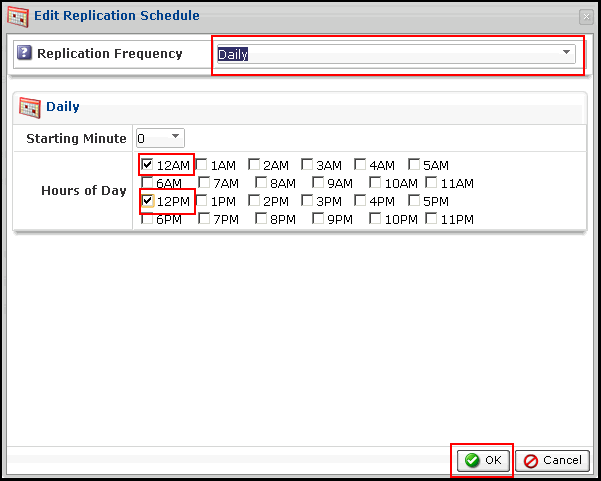
Select "Daily" for Replication Frequency, then click on the checkboxes for "12AM" and "12PM".
Click [OK] to confirm your choice.
After modifying the replication schedule, click on [CREATE AND RUN] button to add the new policy and run it immediately.
If you do not want to perform the backup now, you may click on [CREATE] button instead.

As the new policy runs, you will see the following screen appear. Each of the tabs gives you specific details about your running task. You may close this screen by clicking at "X" in the upper right corner. Closing this screen will not affect your running task.
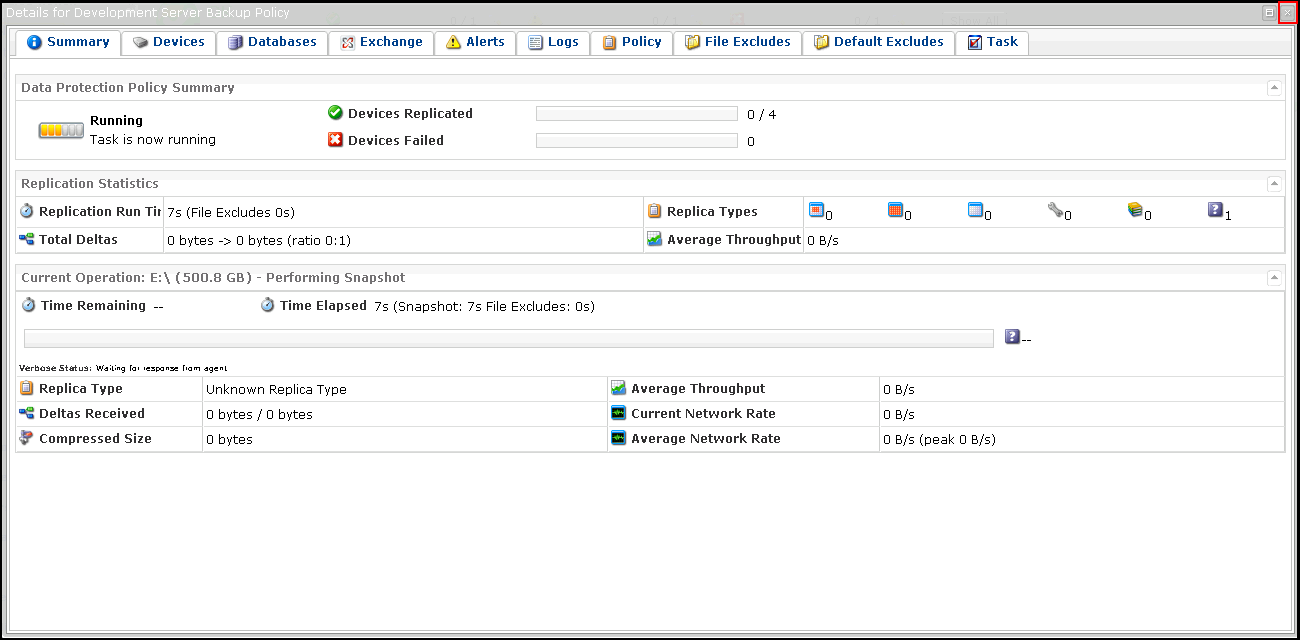
You can also browse your running tasks and the past task history by "Task History".

This completes the steps for backing up your first server. For restoring your server, please follow this link here.
Related Articles
No related articles were found.Attachments
No attachments were found.Article Details
Last Updated
30th of August, 2013


 The article has been updated successfully.
